The Ultimate Chicken Brine Recipe Guide
Achieving juicy and flavorful chicken can be challenging, but there’s a simple technique that can help: brining chicken. This chicken brine method transforms chicken into tender, moist, and savory poultry full of flavor, making it a favorite among professional chefs and home cooks alike.
This comprehensive guide will explore everything you need to know about bringing chicken. From understanding the science behind the chicken brine process to mastering both basic and advanced brine recipes, this guide provides all the knowledge necessary to elevate your chicken dishes to the next level. Whether you’re a beginner or looking to fine-tune your chicken brining technique, you’ll find valuable tips, variations, and troubleshooting advice for perfect results every time.
By following this guide, you can learn how brining can significantly enhance the flavor and juiciness of your chicken. The chicken brine recipe shared here is easy to follow and perfect for those wanting to experiment with different brining methods to find the ideal way to prepare delicious, succulent chicken.
What is Brining and Why is it Vital?
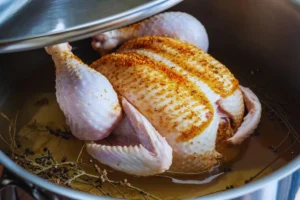
Brining is essentially soaking chicken in a solution of water and salt before cooking. This technique locks moisture inside the meat and infuses it with flavor, resulting in succulent and tender chicken that is incomparable. In this guide, we will delve deep into how brining works, provide a basic step-by-step recipe and explore more advanced techniques and variations. By the end, you’ll have everything you need to become a brining pro!
Understanding the Brining Process
A brine solution typically consists of water, salt, and sometimes sugar and spices. By soaking the chicken in this solution for hours, the meat absorbs flavors and moisture, enhancing its overall taste and texture.
Why Should You Brine Chicken?
Brining has several advantages that make it a preferred method for many cooks:
- Flavor Enhancement: The salt in the brine penetrates the meat, seasoning it throughout and enhancing its natural flavor. Additional ingredients like herbs and spices can impart more nuanced flavors. For a flavorful meal, try this Lemon Butter Garlic Shrimp Pasta.
- Moisture Retention: Brining helps the chicken retain moisture during cooking, which is especially beneficial for lean cuts like chicken breasts that can dry out quickly.
- Tenderness: The brining process changes the structure of the protein in the meat, making it tender and juicy.
The Science Behind Brining
The science of brining involves a process called osmosis. When chicken is placed in a saltwater solution, the higher salt concentration outside the meat draws water into the meat’s cells, along with the dissolved salt. This not only adds moisture to the chicken but also allows the salt to break down muscle proteins, creating a more tender texture.
Here’s a simple breakdown of how brining works:
- Osmosis: Saltwater outside the chicken draws water into the cells, hydrating them and locking in moisture.
- Diffusion: Salt and any flavoring agents diffuse into the meat, seasoning it from the inside out.
- Protein Denaturation: Salt changes the structure of proteins, resulting in a more tender and juicy texture.
Basic Recipe for Brining Chicken
If you’re new to this technique, starting with a simple brine recipe makes good sense. This basic recipe uses very few ingredients but results in moist and flavorful chicken.
Ingredients Needed:
- 4 cups water
- 1/4 cup kosher salt
- 1/4 cup sugar (optional for added flavor)
- Optional flavorings: garlic, bay leaves, peppercorns, fresh herbs (such as thyme or rosemary), lemon slices
Step-by-Step Instructions:
- Dissolve the Salt and Sugar: Combine water, kosher salt, and sugar in a large pot. Over medium heat, stir until the salt and sugar are completely dissolved.
- Add Flavorings: Off the heat, add any flavorings you choose, such as garlic, bay leaves, peppercorns, herbs, or lemon slices.
- Cool the Brine: Allow the brine to cool down completely to room temperature. To accelerate the cooling, you can add ice or place the pot in a bowl of ice water.
- Submerge the Chicken: Place chicken pieces or a whole chicken inside a large resealable bag or container. Pour the cooled brine over the chicken, making sure it is entirely submerged.
- Brine and Refrigerate: Seal the bag or cover the container and refrigerate for at least 1 hour, but preferably up to 6-12 hours, depending on the size of the chicken.
- Rinse and Dry: Before cooking, remove the chicken from the brine, rinse under cold running water, and pat dry with paper towels.
Tips for Successful Brining:
- Use the Right Salt: Not all salts are created equal when it comes to brining; kosher salt is the best. This specific salt has more prominent grains that readily dissolve in water.
- Keep It Cold: Always keep the chicken cold while bringing it, which inhibits the growth of bacteria.
- Timing is Key: Brining time depends on the size and cut of the chicken. Over-brining makes it too salty, but often, it’s the under-brining that doesn’t deliver the desired results.
Advanced Techniques
Once you’ve mastered the basic recipe, there’s nothing to stop you from adding or experimenting with other ingredients and techniques to add more dimension and texture to your results.
Flavorings for Your Brine
- Herbs and Spices: Fresh herbs such as rosemary, thyme, and parsley work well with whole spices like cloves, cinnamon sticks, and peppercorns.
- Aromatics: Garlic, onions, and shallots add a savory note to the brine.
- Citrus: Lemon, lime, or orange slices add a refreshing, tangy flavor.
- Sweeteners: Honey, brown sugar, or maple syrup will balance out the salt and add a hint of sweetness. Check out this Exquisite Lobster Bisque with Saffron Infusion for another recipe with rich flavors.
Dry Brine vs. Wet Brine
Brining can be done in two ways: dry brine and wet brine.
- Dry Brine: Involves rubbing salt and other seasonings directly onto the chicken without using water. This method is more straightforward, requires less space, and results in a crispier skin when roasted.
- Wet Brine: Involves soaking the chicken in a solution of water and salt. This technique is more effective in adding moisture but can result in less crispy skin.
| Brine Type | Pros | Cons |
|---|---|---|
| Dry Brine | Easier, requires less space, and results in crispier skin | Might not penetrate as deeply as a wet brine |
| Wet Brine | More effective for adding moisture; flavors are infused throughout | Can make skin less crispy and require more space |
Bringing Different Cuts of Chicken
Different cuts of chicken require various lengths and methods of brining. Here is a quick guide:
- Chicken Breasts: Brine for 30 minutes to 2 hours for best results.
- Chicken Thighs: Brine for 1 to 4 hours.
- Whole Chicken: Brine for 4 to 12 hours, depending on size.
- Turkey or Duck: Adjust the bringing time according to the weight of the bird. Generally, it will take about 12-24 hours for a whole bird.
Cooking After Brining
How to Cook Brined Chicken
Adequately cooked chicken should be juicy and tender. Here’s a step-by-step guide to cooking brined chicken using different methods.
Roasting
Roasting is one of the most popular ways to cook chicken after brining. It ensures the chicken is cooked through and the skin becomes crispy and golden brown.
- Preheat the Oven: Preheat your oven to 375°F (190°C).
- Prepare the Chicken: After brining, remove the chicken and rinse it thoroughly under cold running water. Pat dry with paper towels. Rub a little melted butter or olive oil on it and season with your favorite herbs and spices.
- Roast: Place the chicken on a roasting rack in a baking dish. Roast for 20 minutes per pound or until the internal temperature reaches 165°F (74°C).
- Rest: Let the chicken rest for 10 minutes before carving to allow the juices to redistribute.
Grilling
Grilling is a fantastic method for cooking brined chicken, especially during warmer months. It imparts a smoky flavor and gives the chicken a beautiful char.
- Preheat the Grill: Heat your grill to medium-high.
- Prepare the Chicken: Take the brined chicken, rinse, and pat dry. Brush with oil and season as desired.
- Grill: Place the chicken and skin side down onto the grill. Cook for about 6-8 minutes per side or until it reaches an internal temperature of 165°F (74°C).
- Rest: Let the chicken rest for a few minutes before serving.
Baking and Frying
Baking and frying are both popular methods for cooking brined chicken. While baking is a healthier option, frying provides a crispy, golden crust. Each technique offers a delicious way to prepare your brined chicken, depending on your preference.
- Baking: Preheat your oven to 400°F (200°C). Place the chicken on a baking sheet and bake for 20-30 minutes or until it reaches an internal temperature of 165°F (74°C).
- Frying: In a deep fryer or large skillet, heat oil to 350°F (175°C). Add the chicken and fry for 10-12 minutes or until golden brown and fully cooked.
Troubleshooting Common Issues
Common Mistakes and How to Avoid Them
Brining is generally easy, but a few common mistakes can significantly affect the outcome. Here’s how to avoid them:
- Overbrining: The chicken becomes too salty and mushy.
- Solution: Brine for less time or use less salt in the brine. Always follow the recommended times based on the size and cut of the chicken.
- Underbrining: The chicken tastes flat and dry.
- Solution: Check your brining time and the amount of salt you are using. More significant cuts and whole chickens may need more time to brine.
- Salty Chicken: The chicken is too salty when it comes out of the cooker.
- Solution: Always rinse the chicken thoroughly under cold running water after brining. If you find the brine too salty for your taste, reduce the amount of salt.
Frequently Asked Questions
Chicken Brine FAQ
- Can I reuse brine?
- No, brine should not be reused as it may contain harmful bacteria from the raw chicken.
- How long should I brine chicken?
- Brining times vary based on the size and cut of the chicken. Chicken breasts: 30 minutes to 2 hours; chicken thighs: 1 to 4 hours; whole chickens: 4 to 12 hours.
- Can I brine chicken too long?
- Yes, over-brining can make chicken too salty and mushy. Always brine for the recommended times.
- Should I refrigerate chicken while bringing it?
- Absolutely. Keeping the chicken cold during brining is crucial to prevent the growth of harmful bacteria.
Serving Suggestions and Pairings
Brined chicken pairs well with a variety of side dishes and sauces. Here are some suggestions:
Side Dishes to Complement Your Meal
- Roasted Vegetables: Carrots, potatoes, and Brussels sprouts are great options.
- Mashed Potatoes: Creamy mashed potatoes provide a comforting contrast to the juicy chicken.
- Salads: A fresh green salad or coleslaw can add a refreshing element to the meal.
Sauces and Gravies
- Gravy: Use the pan drippings from roasted chicken to make a savory gravy.
- Herb Butter: Mix softened butter with fresh herbs and garlic for a flavorful topping.
- Citrus Sauce: A lemon or orange sauce adds a bright, tangy flavor to brined chicken.
Conclusion: Mastering the Art of Brining
Brining is a versatile and effective technique for ensuring juicy, flavorful chicken every time. By understanding the science behind the process, mastering the basic recipe, and exploring advanced variations, you can elevate your chicken dishes and impress your family and friends. Remember to experiment with different flavors and cooking methods to find what works best for you. Happy cooking!
Additional Resources
By following this comprehensive guide, you’re now ready to master the art of brining and create mouth-watering dishes that are sure to impress! Whether you’re cooking for a weeknight dinner or a special occasion, brining will help you achieve perfectly seasoned and tender chicken every time. Enjoy!
The Nutritional Benefits
In addition to the flavor and moisture benefits, brining chicken can also have nutritional advantages, especially when compared to other cooking methods. Although the brining process does add a small amount of sodium to the chicken, it can still be a healthier choice overall.
Nutritional Profile of Brined Chicken
| Nutrient | Amount per Serving | Benefits |
|---|---|---|
| Calories | 160-200 kcal | Brined chicken is relatively low in calories, making it a good option for a balanced diet. |
| Protein | 26-30 grams | High in protein, brined chicken is excellent for muscle growth and repair. |
| Fat | 4-7 grams | Depending on the cut, brined chicken has moderate fat content, primarily healthy fats. |
| Sodium | 200-300 mg | Though brined chicken contains sodium, it’s generally within the recommended daily intake limits when eaten in moderation. |
Health Benefits of Brined Chicken
- Reduced Risk of Overcooking: Brined chicken retains moisture better, reducing the risk of overcooking and thus preserving more nutrients.
- Lower in Fat: Compared to fried chicken, brined chicken has significantly less fat, particularly when roasted or grilled.
- Enhanced Flavor with Less Salt: While brining uses salt, it often requires less seasoning overall after cooking, leading to a flavorful dish that’s not overly salty.
Variations and Recipe Ideas
Once you’ve mastered the basics, you can experiment with different variations and recipe ideas to create diverse and exciting meals.
Flavor Variations for Brine
- Asian-Inspired: Add soy sauce, ginger, garlic, and star anise for a unique, umami-rich flavor profile.
- Mediterranean: Use olive oil, lemon zest, rosemary, and oregano for a bright, herbaceous twist.
- Spicy: Incorporate chili flakes, cayenne pepper, and paprika to give your chicken a kick of heat.
- Sweet and Savory: Mix in apple juice, cinnamon sticks, and brown sugar for a balance of sweet and savory flavors.
Recipe Ideas
- Classic Roast Chicken: Use a simple herb and citrus brine, roast until golden and crisp, and serve with roasted root vegetables.
- Grilled BBQ Chicken: Brine the chicken in a sweet and smoky brine, then grill and baste with your favorite barbecue sauce.
- Lemon Herb Chicken Breasts: Brine boneless chicken breasts in a lemon and herb brine, then bake or grill for a light, healthy meal.
- Crispy Fried Chicken: Brine chicken pieces in a buttermilk and spice brine before coating them in seasoned flour and frying to perfection.
Advanced Tips
Timing and Temperature Control
- Monitor Brining Time: Use a timer to ensure you don’t over-brine, especially for more minor cuts of chicken.
- Temperature is Key: Always brine chicken in a cold environment (below 40°F or four °C) to prevent bacterial growth.
Storage and Safety Tips
- Use Food-Safe Containers: Always use non-reactive containers like glass or food-grade plastic for brining.
- Discard Used Brine: Never reuse brine, as it can harbor harmful bacteria from raw chicken.
Final Thoughts
Whether it’s more flavorful, juicier, or tender, the technique of brining makes any chicken dish simply irresistible. With a good overview of the process, a few basic recipes, and several creative variations in your hands, you can bring the best out of your chicken cooking. Experiment with flavors and methods until you find your perfect brine. Good cooking, and bon appetit with the delicious results of your brined chicken creations!
Follow this comprehensive guide, and you’ll be ready to master the act of bringing and creating mouth-watering dishes that will make your guests drop their jaw. Whether it’s a weeknight dinner or a special occasion, bringing ensures perfect seasoning and tenderness of chicken every time. Enjoy!